Last week someone asked a question about developing leg strength and muscle with bad knees. I realized that too often people think they can’t workout their legs when they have knee pain.
And while you don’t just want to jump into a lower body strength routine if you aren’t sure what is going on with your knees, there are knee-friendly lower body exercises you can do once you’ve identified the problem and are doing the proper rehab to take care of them.
The exercises below put little to no strain on the knees and also strengthen common areas of weakness that contribute to knee pain….Aka WEAK GLUTES and EXTERNAL ROTATORS!
Using these exercises (along with a proper prehab/rehab routine that includes foam rolling and stretching) you can ALMOST prevent knee pain from ever returning!
8 Knee Friendly Lower Body Exercises:
1. Glute Bridge (Table Top Bridge, Off Box Bridges, Hip Thrusters):
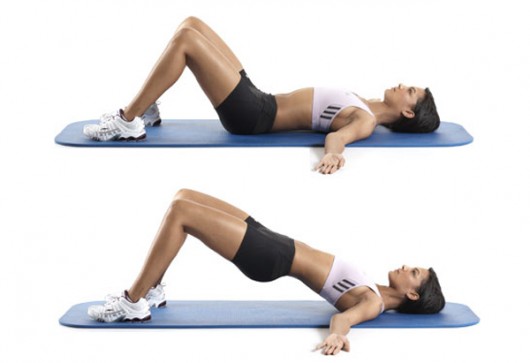
I love glute bridges or any variation of the glute bridge because I think it is probably the best exercise for EVERYONE to do. It strengthens your glutes and hamstrings and opens up your hips while also helping to strengthen your core.
And it is completely KNEE FRIENDLY. It is actually a great rehab/prehab exercise and, depending on the variation you are doing, a great ACTIVATION EXERCISE to include in your warm up!
Also, the glute bridge and curl can be a knee-friendly variation; however it is more difficult. For variations of the glute bridge and curl, check out this video : Glute Bridge Variations
2. Reverse Hyper:
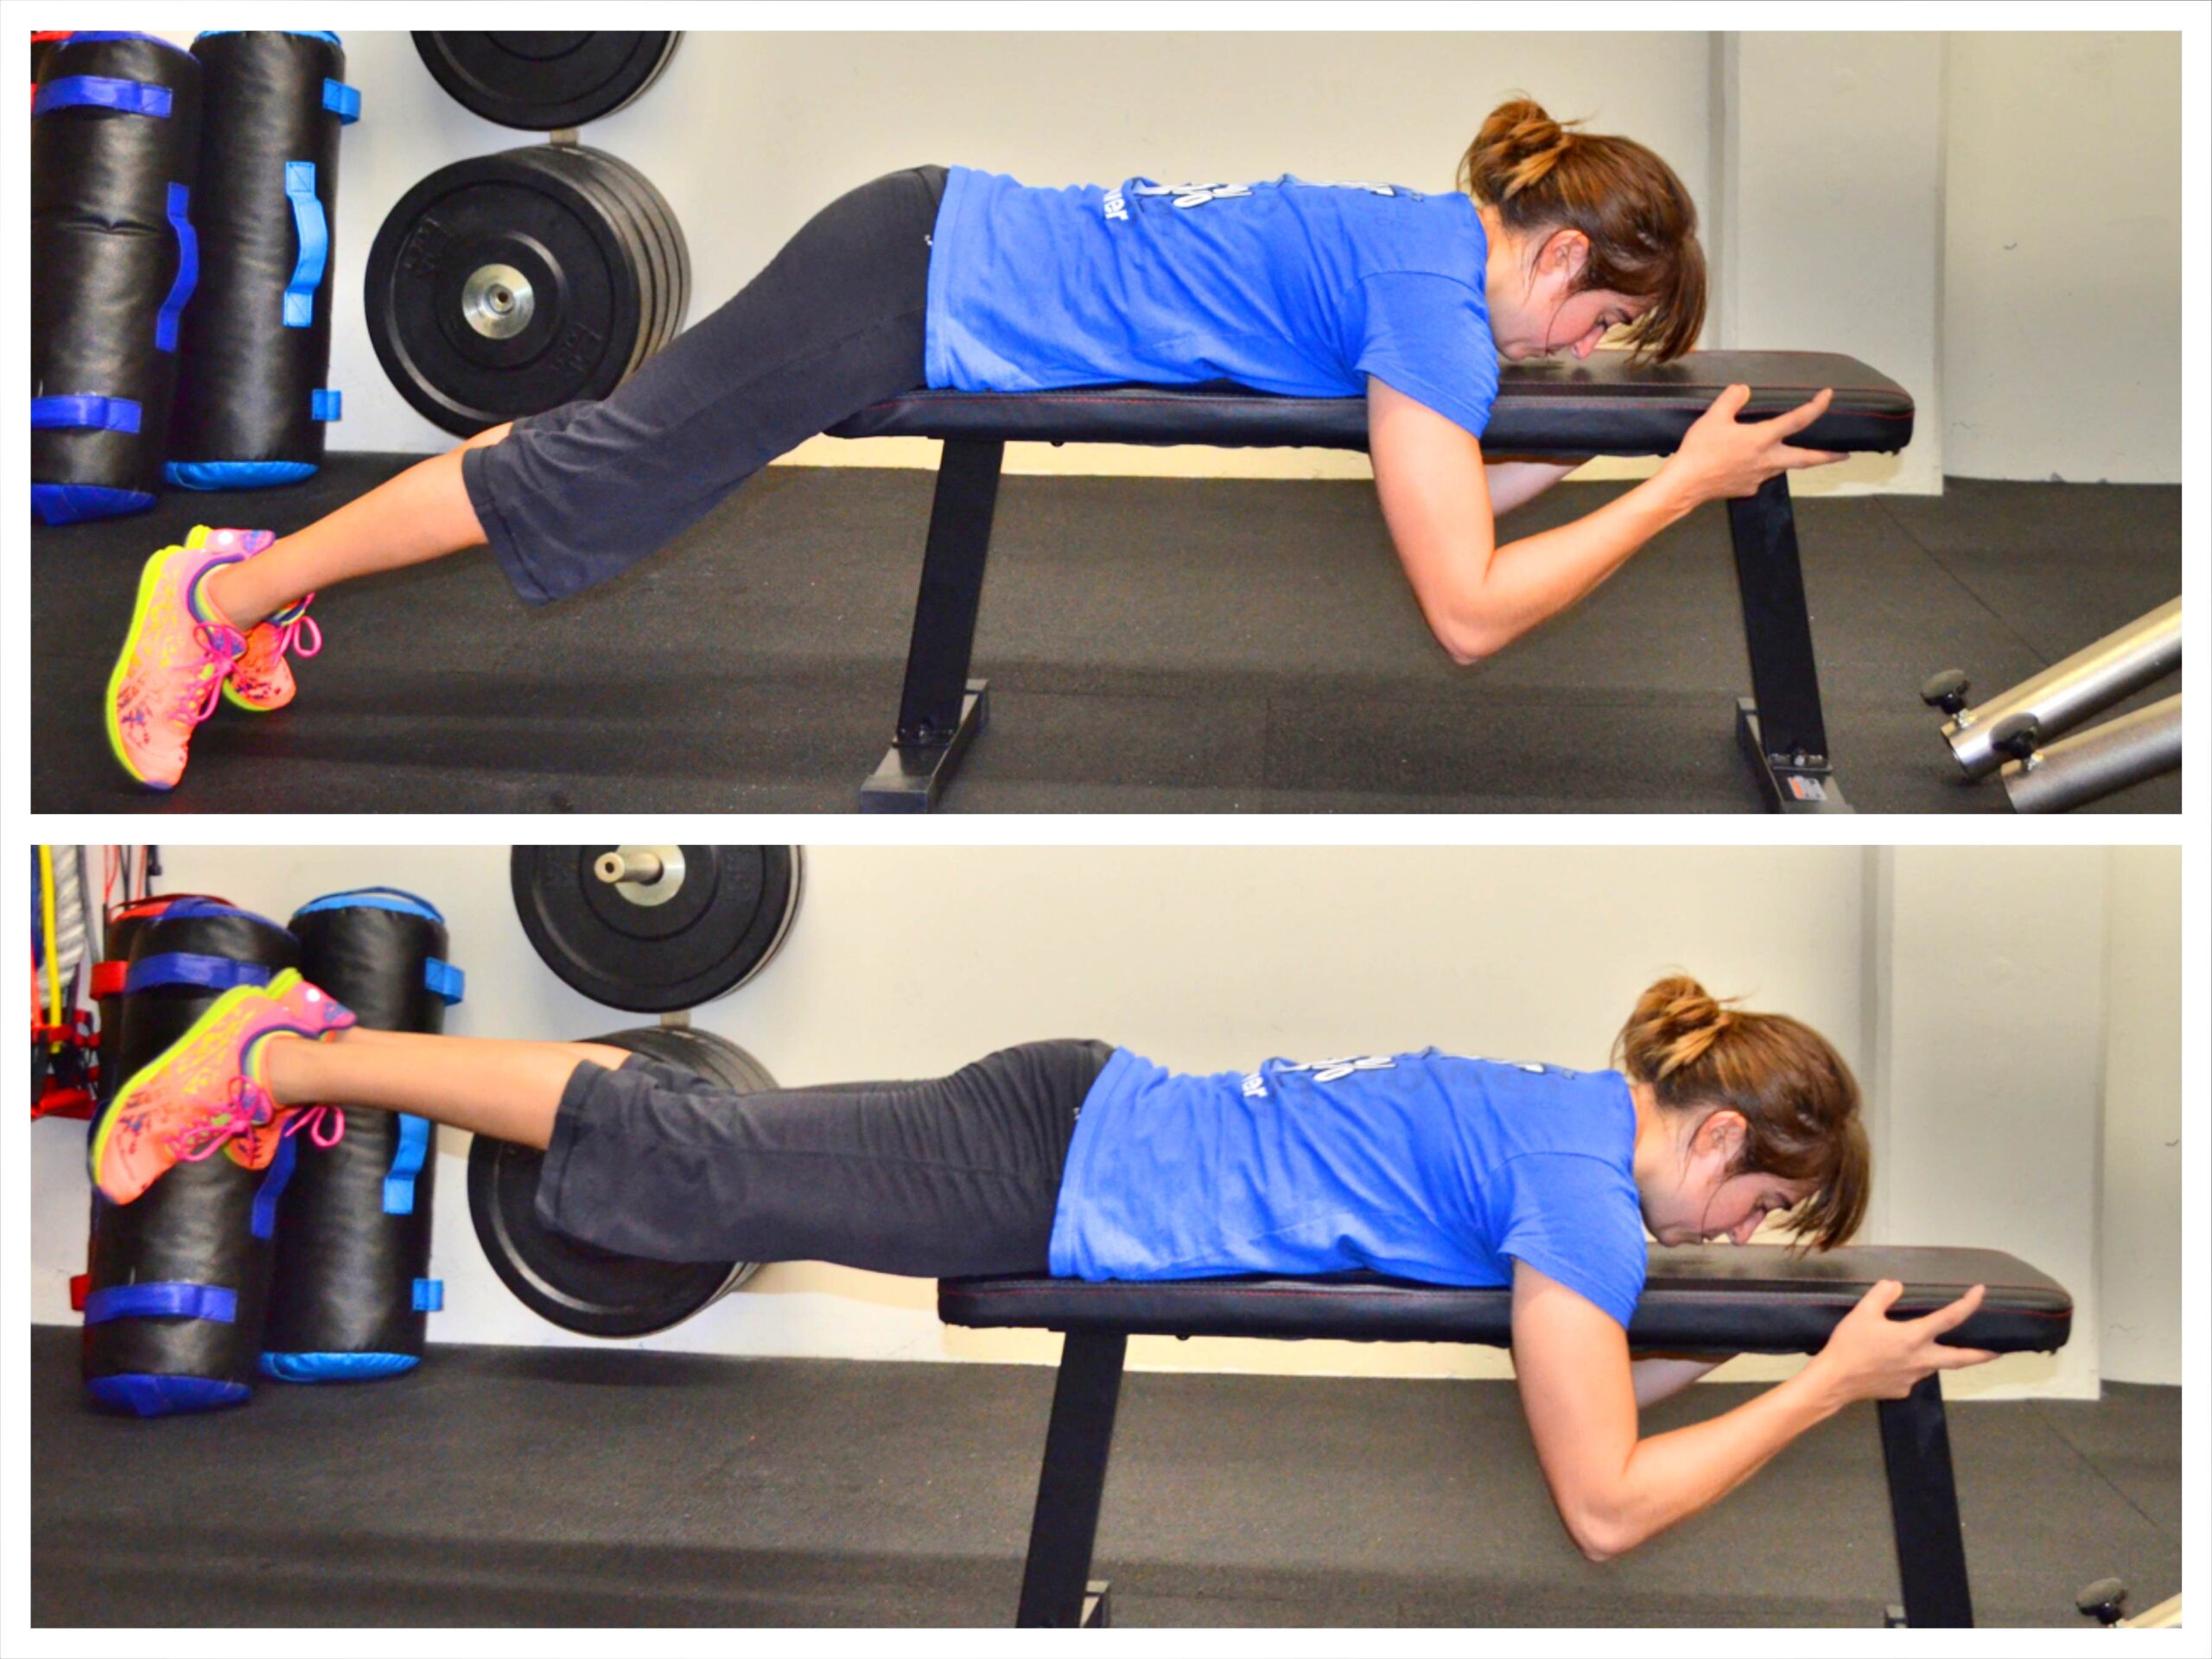
Another great glute exercise, the Reverse Hyper is completely knee-friendly and great for everyone from the beginner to the advanced lifter.
The key with Reverse Hypers is to make sure you hold at the top. Do not rush through this move.
To do the Reverse Hyper, lie face down on a table, bench or box. You want your hips close to the edge. The more your hips are on the box or bench, the easier it will be to keep your core tight and not let the move go into your back. The further off the bench your hips are, the more the move will require your abs to stay engaged to protect your low back.
Hold on to something in front of you if you want. Keep your upper body relaxed. Squeeze your legs together and point your toes out a bit if you are having trouble activating your glutes. Lift your legs to basically parallel to the ground, keeping your legs straight. Do not hyperextend your back and lift way higher than parallel. You do not want to feel this in your low back. Hold for 2-5 seconds and then lower down. Keep your core tight and really squeeze your glutes as you lift.
3. Anterior Reach Lunge:
I think one of the hardest things to do when you have knee pain is work your entire leg. It is easy to stay focused on your posterior chain since many of those moves require little to no knee flexion.
BUT with the Anterior Reach Lunge you can work your entire leg and add a bit more variety to your routine. Beginners will want to start with no weight while more advanced exercises will want to weight this down.
Add weight slowly and make sure your form is correct so that you keep this move KNEE FRIENDLY!
To do the Anterior Reach Lunge, Stand with your feet together and take one big step forward. Bend your front knee as you step forward, keeping your front heel down as you lunge forward. You will not bend your front knee to 90 degrees. Do not come up onto your front toe as you lean your torso over keeping your back flat. Keep your weight in your front heel and your back leg straight. Then come back up and step your front foot back. Complete all reps on one side before switching. Beginners will reach their hands overhead when they lunge. Advanced exercisers will hold weights down by their front leg as they lunge forward and hinge over.
4. Single Leg Deadlift:
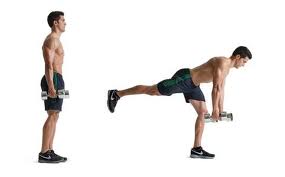
I often encounter clients with knee pain that also have (or had) foot and ankle pain/injury. Often those injuries weren’t properly rehabbed, which ends up leading to knee pain because of improper movement patterns.
For those people, I love using single leg deadlifts because they work on the mind-body connection to improve movement patterns while also working on balance and strengthening the lower leg, hamstrings and glutes.
To do a Single Leg Deadlift, stand on one foot with the knee of that standing leg slightly bent. Hinge over at your hips, sweeping the other leg back toward the wall behind you. Pretend you are driving the heel of that foot straight into the wall behind you. Lean forward with your upper body as you hinge forward, keeping the back nice and flat. Make sure that as you hinge, you are sitting into the heel of your standing leg. Do not lean forward and come up onto your toes.
To stand back up, drive through the heel of your standing leg and squeeze your glute at the top. Try not to tap the other foot down at all or at least not till you are fulling standing. Complete all reps on one side before switching to the other leg. To make the move harder, do a 3-5 count lower down toward the ground. Take 3-5 seconds to hinge over and then push straight back up. You can also add weight to the move to make it more challenging.
5. Straight Leg Deadlift/Good Morning:

The straight leg deadlift is another great standing posterior chain move that really works the glutes and hamstrings (and if you front load the move with weight at your chest, it can also really challenge your core!)
The key with this move, and the Single Leg Deadlift, is to not lock out your knees and to make sure you keep your back flat and don’t round it while reaching toward the ground.
To do the Straight Leg Deadlift, hold a sandbag, barbell, kettlebells or dumbbells in you hands in front of you or by your sides. With your feet no wider than hip-width apart, hinge over, keeping your back flat. Your knees should be soft as you hinge over and push your butt back toward the wall behind you. You should feel a nice stretch down your hamstring as you hinge over. Do not let your back round toward the ground. Keep your weight in your heels. Come back up to standing, driving through your heels and squeezing your glutes at the top.
You can also hold a sandbag or weight at your chest as you perform the hinge.
6. Band Exercises: Clams, Monster Steps, Side Shuffle, Kickbacks, Side Raises:
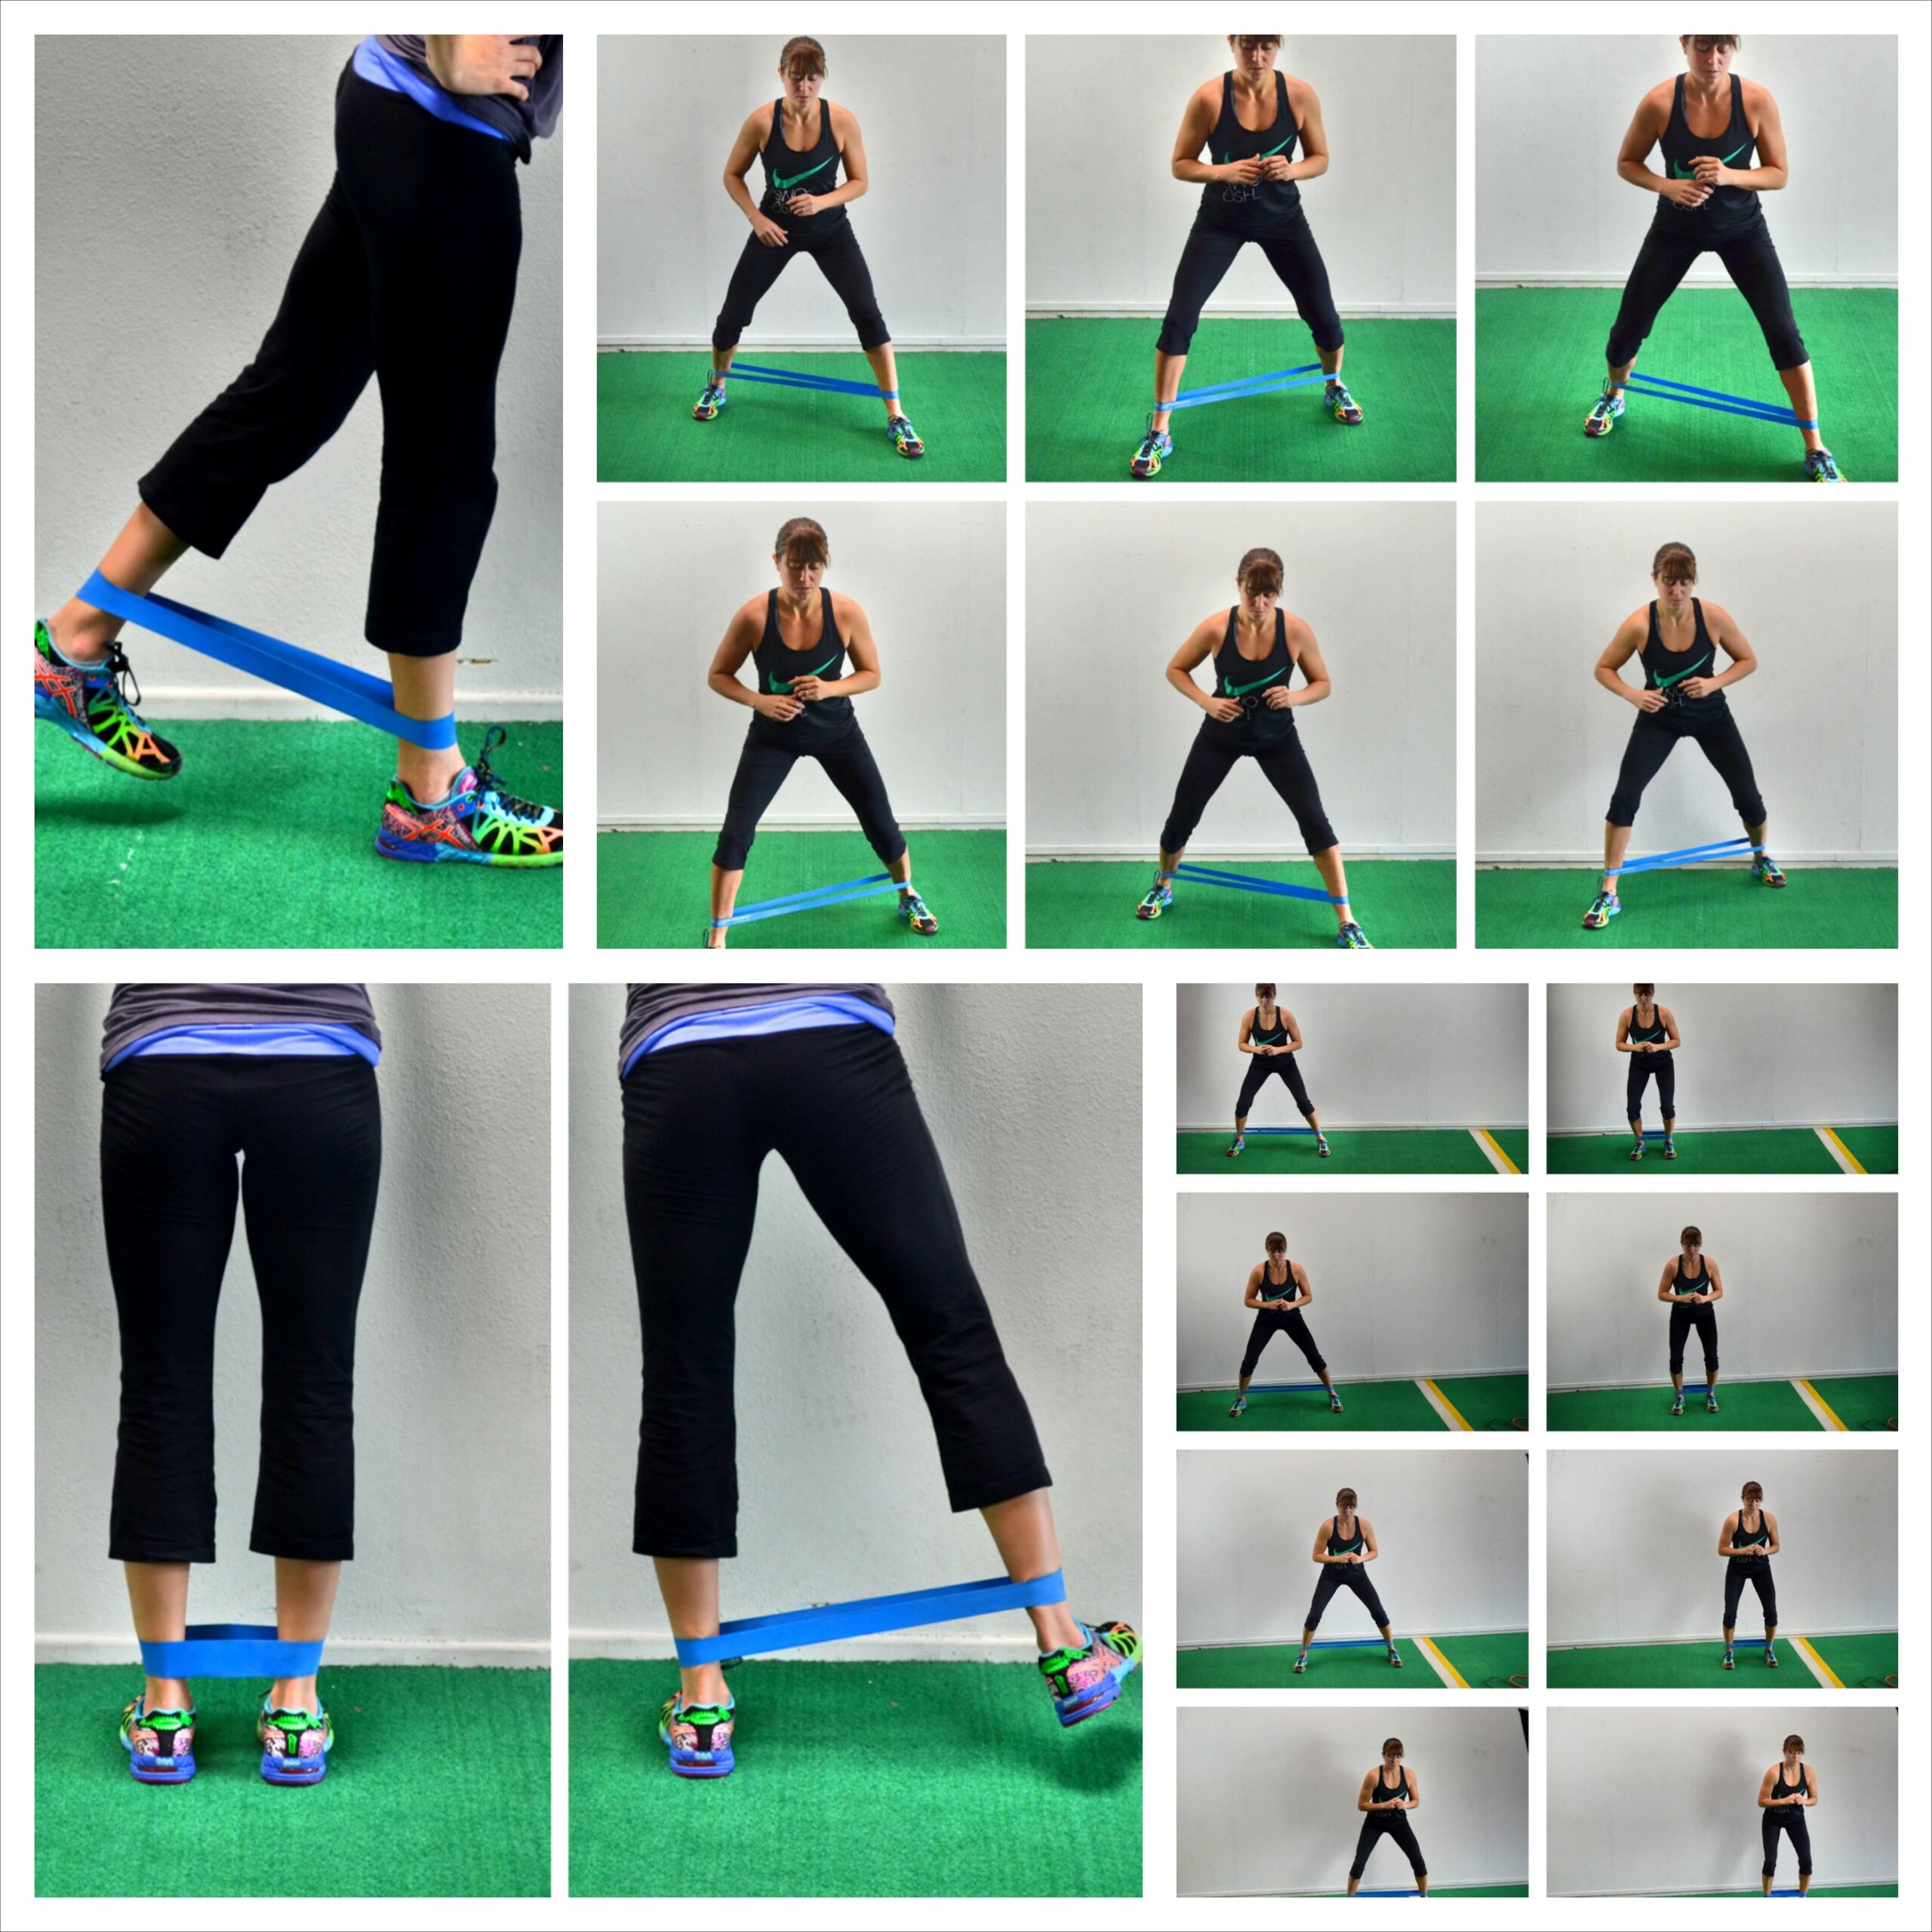
The mini band is a great tool to own because it is small, lightweight and tortures the muscles of your butt like none other and complete knee friendly!
There are so many great mini band moves to get your glutes activated and help you prevent knee pain that I couldn’t pick just one to list here…So I went with a general…MINI BAND MOVES!
Here is a great list of all the different moves you can do with a $3 mini band. All of them will strengthen your glutes and you can use a few different ones to work them from every angle.
They can be included as part of your workout or as part of your warm up, but they need to be included because they will help you strengthen your glutes and lessen your knee pain.
7. Yoga – Mobility Work
Often we suffer from pain and injury because we lack mobility, which means smaller, weaker muscles end up doing work they shouldn’t be doing.
Therefore, in order to get rid of your knee pain, you need to improve your mobility while you activate the weak muscles. The best way to do this is YOGA
Yoga uses isometric exercises do just that. The following isometric leg poses open up your hips and improve your mobility while helping you develop muscular stability. Not only are these moves knee-friendly but they develop the mobility and stability you need to get rid of the pain and prevent it from ever coming back!
Warrior II – Set up in a nice wide lunge stance with one foot forward and one foot back. Turn the back toe out so your feet are perpendicular. Your front foot should be at the instep of your back foot when you turn it out. Sink down into a lunge, keeping the back leg straight and the front heel firmly planted. Try to get your front knee bent to 90 degrees and your quad parallel to the ground. You may find you need to step your front foot forward a bit more to sit comfortably in the lunge and keep the front heel down. The lower you sink in the lunge, the harder the move will be. Do not let your front knee cave inward. Squeeze the glute and keep the knee in line with your hip and your ankle. While in the low lunge, open your arms out at shoulder height. Reach one forward over the front leg and the other back over the back leg. Keep the chest open and do not lean forward. Keep your weight centered in the lunge.

Warrior III – Balance on one leg with the knee slightly bent. Hinge over lifting your back leg toward the wall behind you. Lean your torso over, keeping your back flat and your core tight. Reach your hands overhead in front of you. Hold in this position. Do not let your back round or your other foot touch down. Keep your arms in line with your body. You want a nice straight line from the bottom of your lifted heel to the end of your finger tips. Make sure you do not lock the standing leg out as you hold. Beginners may need to reach back toward their foot instead of out in front of them. Using a wall can also help beginners. Stand with a wall behind you and when you hinge over have the lifted foot lightly touch the wall behind you to help you balance.

Crescent Pose – Start in a high plank position. Step one foot up between your hands with the front knee bent and the back leg out straight. Your front heel will be down while your back heel will be up. Lift your hands up off the ground and reach them back and overhead as you stay low in the lunge. Keep your front heel down as you sit back into the lunge. If your front heel is coming up, you may want to step your front foot forward a bit more. As you hold the lunge, your back heel will stay up and the back leg will stay straight. Feel a nice stretch down the front of the hip and quad of the back leg. Hold then switch to the other side.

(Warrior I, Triangle Pose, Glute Bridge Hold, Squat Hold, Half Moon, Tree Pose…All of these are great as well…AKA Yoga can be a super beneficial thing for anyone with knee pain!)
Just like there are a ton of mini band moves that are safe to do if you have bad knees, there are also a ton of quadruped glute and core exercises that you should include in your routine if you have knee pain.
These moves also focus on activating the core and can even open up your hips.
The three below are a few of my favorites because they hit the glutes from numerous different angles while also building core strength. They also all can help improve your hip mobility.
Fire Hydrants – Place your hands underneath your shoulders and your knees underneath your hips. Flex your feet. Then raise one leg out to the side, keeping the knee bent to 90 degrees. Lift it as high as you can while keeping your arms straight. Try to not let the foot get higher than the knee or the knee get higher than the foot. Really squeeze the butt cheek as you lift. Hold for a second or two at the top. Lower down and then repeat. Complete all reps on one side before switching.
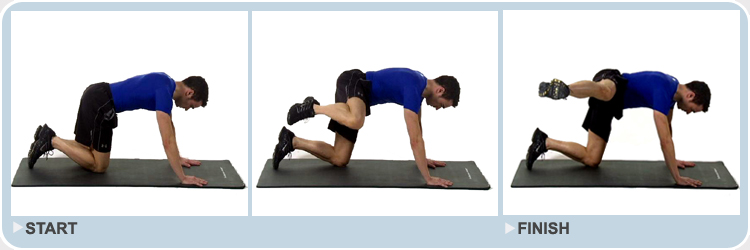
Bird Dogs – Place your hands under your shoulders and your knees under your hips. Flex your feet. Kick one leg out straight as if kicking it into the wall behind you while you reach the other arm out straight toward the wall in front of your head. Don’t worry about lifting your leg or arm up high. Really try to drive your arm and leg toward opposite walls. Squeeze your glutes and keep your belly button pulled in toward your spine. As you lower your arm and leg, bend them and bring them together under your body. Try to touch your knee to your elbow before extending back out. Repeat all reps on one side before switching to the other side. All reps should be done in a slow and controlled manner. You should even hold for a second or two at the top of the move. You can advance this move by adding a resistance band around your leg and opposite arm so that you lengthen the resistance band as you reach out and have to fight against it pulling you back in.

Donkey Kickbacks – Keep the knee bent close to 90 and keep the foot flexed as you kick one leg back and drive the heel up toward the ceiling. Don’t let the low back arch. Make sure that as you lift you are squeezing the glute of the leg you are raising. Also make sure the foot is driving straight up to the ceiling. And do not let your elbows bend to get the leg higher. Hold at the top and squeeze the glute then lower and repeat. Make sure you are driving straight back and that the knee of the raised leg isn’t flaring in or out.

8. Farmer’s Walk
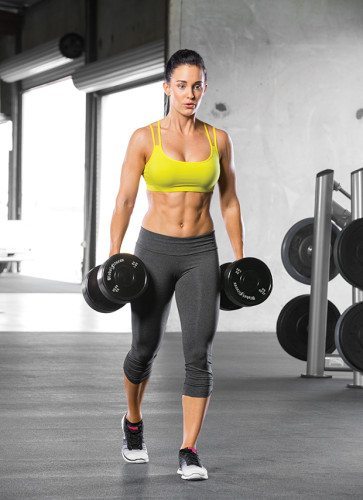
The farmers walk is literally one of the easiest exercises you can do that will not only develop your leg muscle and strength, but your overall physique. You just pick up some weight and walk for as long as you can, drop, and repeat. There are so many variations of the farmers walk that you can do to break the monotony. If you want to learn those check out this link: 15 Farmers Walk Variations
But for purposes of this post we will stay as basic as possible. So use dumbbells. As you get stronger, your can choose any variation you want!!!
Legs contains the largest group of muscles on your body. If you dont have a strong set of legs, life will become increasingly hard as the years pass. I do not want to see anyone have mobility issues in their elder years so i feel its my duty to share any and all information possible to prevent thee things. So now that you have some options, start working on building a balanced physique. If you have any questions or comments please feel free to leave them below. Train Smart!!!!!!